1. How IPsec VPN Site-to-Site Tunnels Work?
In order to understand how IPsec VPN site-to-site tunnels work, it is important to fully understand what each term individually means, and what part does each of the mentioned object play in a complete IPsec VPN site-to-site network setup.
1.1. What Is IPsec?
IPsec stands for Internet protocol security or IP Security. IPsec is a protocol suite that encrypts the entire IP traffic before the packets are transferred from the source node to the destination. IPsec is also capable and responsible for authenticating the identities of the two nodes before the actual communication takes place between them. IPsec can be configured to use any of the available algorithms to encrypt and decrypt the network traffic.
IPsec can be configured to work in either of the two available modes:
1. Transport Mode – In Transport Mode, IPsec only encrypts and/or authenticates the actual payload of the packet, and the header information remains intact.
2. Tunnel Mode – In Tunnel Mode, IPsec encrypts and/or authenticates the entire packet. After encryption, the packet is then encapsulated to form a new IP packet that has different header information. IPsec is configured to be used in Tunnel Mode while setting up secure site-to-site VPN tunnels.
1.2. What Is Virtual Private Network or VPN?
Virtual Private Network or VPN is a type of network setup in which the public telecommunication medium and the public network, i.e. the Internet, is used to transmit data from one office at one geographical location to another office at another geographical location. Since the public telecommunication medium and the public network is unreliable when it comes to security of the information, administrators create secure tunnels between the source and destination nodes/sites. The data is transferred via these tunnels.
Since the tunnels that administrators create only allow communication between the source and destination nodes/sites, the users can access the data and resources from the remote locations as simply and easily as if they were accessing the information in their local area network.
1.3. What Is a Site?
In terms of computer networking and virtual private network or VPN, a site is an area or a premises of an office in which two nodes that are connected to each other can communicate over high bandwidth network medium.
Organizations that have multiple branches scattered across the planet generally use VPN-s to connect one branch office to another, or to enable communication between the branch offices and the head office/datacenter (hub and spoke).
1.4. How Site-to-Site VPN Works With IP Sec?
After understanding each of the above discussed terms individually, it would be easier to understand how the network communication takes place using the secure VPN tunnel. Below is the process that takes place during site-to-site communication over an IPsec VPN site-to-site tunnel:
- The source computer C1 forwards the packet P1 with the destination IP address of the computer C2 to the router R1 (default gateway).
- The router R1 receives the packet P1 and encrypts the entire packet using the specified algorithm.
- After encrypting the packet, the router R1 encapsulates the whole packet to form a new packet NP1. This packet has IP address of R1 as source IP and the IP address of the router R2 (the router placed at the destination location) as the destination IP.
- The router R1 then forwards the packet NP1 to the IP address of R2 using the Internet.
- The destination router R2 receives the packet.
- The router R2 decapsulates the NP1 to get the original packet P1.
- The router R2 decrypts the packet P1 using the appropriate algorithm.
- The router R2 then forwards the packet P1 to the destination computer C2, where the packet was actually supposed to reach.
In place of Router R1, it can be any VPN enabled device (Firewall, Router, Server etc).
2. VPN Parameters
Let’s assume the following VPN Parameters:
Host Side – Cisco ASA
Peer IP: 2.2.2.2
Encryption Domain: 20.20.20.0/29, 30.30.30.30/32
Remote Side – Openswan
Peer IP: 1.1.1.1
Encryption Domain: 10.10.10.0/28
Tunnel Properties
Phase 1:
Authentication Method: Pre-Shared Key
Encryption Scheme: IKE v1
Diffie-Hellman Group: Group 2 (1024 bit)
Encryption Algorithm: AES-256
Hashing Algorithm: SHA1
IKE Negotiation Mode: Main Mode
Lifetime (for renegotiation): 28800 sec
Phase 2:
Encapsulation: ESP
Encryption Algorithm: AES-256
Hashing Algorithm: SHA1
Perfect Forwarding Secrecy: PFS-G2
Lifetime (for renegotiation): 28800 sec
First we will configure the VPN at Host Site – Cisco ASA.
3. Cisco ASA Configurations
configure terminal
!Phase 1 Configuration
crypto ikev1 enable OUTSIDE
crypto ikev1 policy 12
authentication pre-share
encryption aes-256
hash sha
group 2
lifetime 28800
exit
!Phase 2 Configuration
crypto ipsec ikev1 transform-set ESP-AES-256-SHA esp-aes-256 esp-sha-hmac
access-list site-to-site-vpn extended permit ip 20.20.20.0 255.255.255.248 10.10.10.0 255.255.255.240
access-list site-to-site-vpn extended permit ip host 30.30.30.30 10.10.10.0 255.255.255.240
tunnel-group 2.2.2.2 type ipsec-l2l
tunnel-group 2.2.2.2 general-attributes
default-group-policy 2.2.2.2
tunnel-group 2.2.2.2 ipsec-attributes
ikev1 pre-shared-key s0m3c0mpl3xPWD
exit
crypto map vpn 1 match address site-to-site-vpn
crypto map vpn 1 set peer 1.1.1.1
crypto map vpn 1 set pfs
crypto map vpn 1 set ikev1 transform-set ESP-AES-256-SHA
4. Openswan
Openswan is an open source, user space IPsec implementation available in Linux. It employs the key establishment protocol IKE (Internet Key Exchange) v1 and v2, implemented as a user-level daemon.
4.1. Installation
Run the
yum install wget bind-utils openswan lsof
command to install Openswan.
4.2. Configuration
4.2.1. Locations
This section lists and explains important directories and files used for configuring Openswan.
/etc/ipsec.d – main directory. Stores Openswan related files./etc/ipsec.conf – master configuration file. Further *.conf configuration files can be created in /etc/ipsec.d for individual configurations./etc/ipsec.secrets – master secrets file. Further *.secrets files can be created in /etc/ipsec.d for individual configurations./etc/ipsec.d/cert*.db – Certificate database files. The old default NSS database file is cert8.db. From CentOS 7 onwards, NSS sqlite databases are used in the cert9.db file./etc/ipsec.d/key*.db – Key database files. The old default NSS database file is key3.db. From CentOS 7 onwards, NSS sqlite databases are used in the key4.db file./etc/ipsec.d/cacerts – The old Location for Certificate Authority (CA) certificates. It is recommend to import CA certificates into the NSS database files. This location will be obsoleted in the next version of CentOS 7./etc/ipsec.d/certs – The old location for machine certificates. It is recommend to import machine certificates into the NSS database files. This location will be obsoleted in the next version of CentOS 7./etc/ipsec.d/policies – Opportunistic Encryption groups policies. These are not in use in CentOS 7./etc/ipsec.d/nsspassword – NSS password file. This file does not exist by default, and is required if the NSS database in use is created with a password.
4.2.2. Global Configuration Parameters
This section lists some of the configuration options available for the global config setup section in /etc/ipsec.conf.
protostack – defines which protocol stack is used. The default option in CentOS 7 isnetkey. Other valid values are klips and mast. These alternative IPsec kernel stacks require a third-party kernel module which is not supported by CentOS 7. Alternative stacks are mostly in use with embedded Linux devices.nat_traversal – defines if NAT-traversal (RFC 3947) for connections are accepted. Default is yes.dumpdir – defines the location for core dump files. Changing this will require changing the SELinux policies to match the new location.nhelpers – defines the number of helper threads used for cryptographic operations.virtual_private – subnets allowed for the client connection. Ranges that may exist behind a NAT router through which a client connects. This should contain the RFC 1918 address space with an exception for any LAN range used by the server.plutorestartoncrash – set to yes by default.plutostderrlog – When enabled, the log file name to use instead of the syslog facility.
4.2.3. Connection Specific Parameters
This section lists some of the configuration options available per connection in a conn section.
auto – defines the startup profile for this connection. The default is ignore. Other valid values are start (initiate), add (respond-only) and route (Initiate on-demand).type – defines the type of tunnel policy used. The default is tunnel for Tunnel Mode. Other valid values are transport for Transport Mode (used with L2TP) and passthrough which bypasses IPsec completely.authby – defines the type of authentication used. The default is rsasig for raw RSA keys. . Other valid values are secret for Pre-Shared Key (PSK) and never for pass-through connections.rekey – defines whether the connection should rekey when it reaches its expiry time. The default is yesand is usually used for static VPNs. The value no is mostly used for supporting dynamic VPN clients.
4.3. Commands
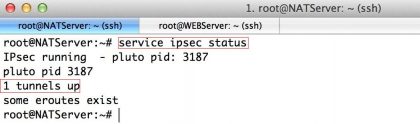
This section provides examples of commands used for Openswan. Note that except for checking the status of a service, these commands must be run as root.
Service Commands for Openswan
systemctl start ipsec
systemctl stop ipsec
systemctl status ipsec
Loading and Unloading a Connection
ipsec auto --add connection_name
ipsec auto --delete connection_name
Initiating, On-demand and Terminating a Connection
ipsec auto --up connection_name
ipsec auto --route connection_name
ipsec auto --down connection_name
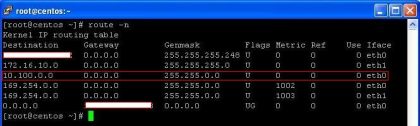
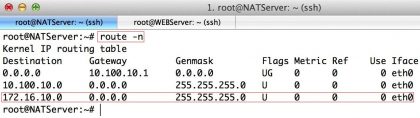
Checking the IPsec Kernel Subsystem
ip xfrm policy
ip xfrm state
ip -s xfrm monitor
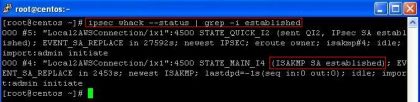
Checking the IPsec User Space Subsystem
ipsec auto --status
ipsec verify
To start the ipsec daemon provided by Openswan, issue the following command as root:
systemctl start ipsec
To ensure that Openswan will start when the system starts, issue the following command as root:
systemctl enable ipsec
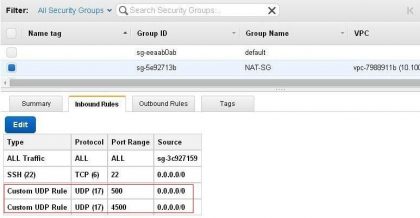
Openswan requires the firewall to allow the following packets:
UDP port 500 for the Internet Key Exchange (IKE) protocol
UDP port 4500 for IKE NAT-Traversal
Protocol 50 for Encapsulated Security Payload (ESP) IPsec packets
Protocol 51 for Authenticated Header (AH) IPsec packets (uncommon)
4.4. VPN Configuration using Openswan
Openswan does not use the terms “source” or “destination”. Instead, it uses the terms “left” and “right” to see end points (the hosts). This allows the same configuration to be used on both end points in most cases, although most administrators use “left” for the local host and “right” for the remote host.
To enable Openswan to read the custom configurations files, use an editor running as root to edit the main configuration file, /etc/ipsec.conf, and enable the following line by removing the # comment character so that it looks as follows:
include /etc/ipsec.d/*.conf
First, just to view the basic config setup we need to open ipsec.conf file
vi /etc/ipsec.conf
# /etc/ipsec.conf – Openswan IPsec configuration file
#
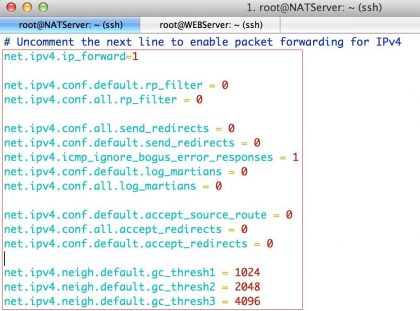
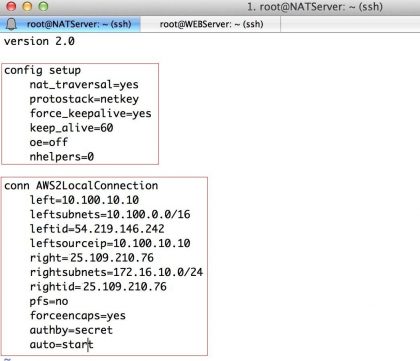
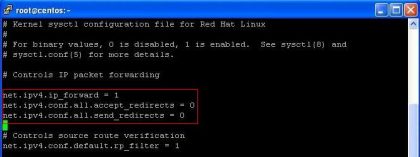
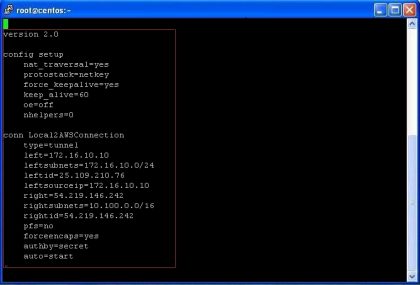
config setup
# Debug-logging controls: “none” for (almost) none, “all” for lots.
# klipsdebug=none
# plutodebug="control parsing"
# For CentOS, leave protostack=netkey
protostack=netkey
# If Peer is not behind any NAT
nat_traversal=no
virtual_private=%v4:10.0.0.0/8,%v4:192.168.0.0/16,%v4:172.16.0.0/12,
%v4:25.0.0.0/8,%v6:fd00::/8,%v6:fe80::/10
oe=off
# Enable this if you see “failed to find any available worker”
# nhelpers=0
Using an editor running as root, create a file with a suitable name in the following format:
vim /etc/ipsec.d/my_host-to-host.conf
conn host-to-host-tunnel
##### General connection config
type=tunnel
authby=secret
auto=start
dpddelay=20
dpdtimeout=40
dpdaction=restart
rekey=yes
keyingtries=%forever
##### Network/Routing config: Host Side
left=1.1.1.1
leftnexthop=%defaultroute
leftsubnets=10.10.10.0/28
##### Network/Routing config: Remote side
right=2.2.2.2
rightnexthop=%defaultroute
rightsubnets={20.20.20.0/29,30.30.30.30/32}
##### Phase-1 Config
keyexchange=ike
ike=aes256-sha1;modp1024
ikelifetime=28800s
##### Phase-2 Config
phase2=esp
phase2alg=aes256-sha1
pfs=yes
compress=no
keylife=28800s
##### End of Tunnel Config
Add the Pre-Shared Key by editing in ipsec.secrets
vi /etc/ipsec.d/my_host-to-host.secrets # myip-remoteip
1.1.1.1 2.2.2.2: PSK "s0m3c0mpl3xPWD"
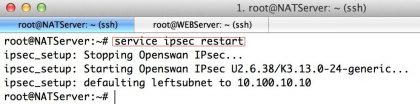
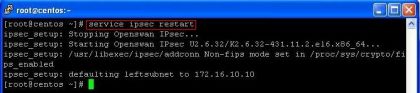
Ensure ipsec has been started:
systemctl start ipsec
Issue the following command as root to load the IPsec tunnel:
ipsec auto --add host-to-host-tunnel
To bring up the tunnel, issue the following command as root, on both left and right hosts:
ipsec auto --up host-to-host-tunnel