There’s still no official Linux client for Google Drive, but you can back up to your Google Drive using the rclone utility right from the command line.
Where’s Google Drive on Linux?
Despite promising Linux support “coming soon” back in 2012, there’s no indication that Google will ever produce a native Linux client for Google Drive. There are several unofficial third-party solutions, such as InSync, overGrive and ODrive, and some file browsers allow integration with your Google Drive, such as Files in GNOME.
The third-party applications are commercial products, requiring either an outright purchase or a subscription. They work well they don’t cost much, and in fact, overGrive does have a free version, offering limited functionality for no cost.
But what if you want to create and run backups from the command line? Or to incorporate that functionality into scripts? That’s all possible thanks to an amazing application called rclone. In fact, with rclone you can back up, download, and synchronize files to over forty different cloud solutions. It’s like rsync for clouds.
Installing rclone
rclone almost certainly won’t be installed on your Linux computer by default. Happily, there’s an installation script that should work on all distributions. The installation process uses curl. On the computers used to research this article, already had curl installed but curl had to be installed on Ubuntu 22.04 LTS.
On Ubuntu, run this command to install it:
sudo apt-get install curl
Once curl has been installed, install rclone with this command:
curl https://rclone.org/install.sh | sudo bash
or
sudo apt install rclone
When the rclone installation has finished, you’ll see a success message.
This has installed the rclone program on your Linux computer. The next step is to run through the setup process and authenticate rclone to access your Google Drive.
Creating an rclone Remote Connection
Connections to remote cloud services are called “remotes” in the rclone world. We need to create one for Google Drive. Start the rclone configuration process with this command:
rclone config
There are a lot of questions in the configuration process. But don’t be disheartened, many of them can be left at their default values and simply accepted by pressing “Enter.”
rclone tells us there are no remotes configured. Press “n” and press “Enter” to create a new remote. It will prompt you for a name. We’re going to call it “google-drive.” Use whatever name you like.
aghassi@111:~$ rclone config

2023/04/29 13:15:18 NOTICE: Config file "/home/aghassi/.config/rclone/rclone.conf" not found - using defaults

No remotes found - make a new one

n) New remote

s) Set configuration password

q) Quit config

n/s/q> google-drive
A long menu allows you to choose the type of storage you’re creating a remote connection to.
n/s/q> n

name> google-drive

Type of storage to configure.

Enter a string value. Press Enter for the default ("").

Choose a number from below, or type in your own value

1 / 1Fichier

\ "fichier"

2 / Alias for an existing remote

\ "alias"

3 / Amazon Drive

\ "amazon cloud drive"

4 / Amazon S3 Compliant Storage Provider (AWS, Alibaba, Ceph, Digital Ocean, Dreamhost, IBM COS, Minio, Tencent COS, etc)

\ "s3"

5 / Backblaze B2

\ "b2"

6 / Box

\ "box"

7 / Cache a remote

\ "cache"

8 / Citrix Sharefile

\ "sharefile"

9 / Dropbox

\ "dropbox"

10 / Encrypt/Decrypt a remote

\ "crypt"

11 / FTP Connection

\ "ftp"

12 / Google Cloud Storage (this is not Google Drive)

\ "google cloud storage"

13 / Google Drive

\ "drive"

14 / Google Photos

\ "google photos"

15 / Hubic

\ "hubic"

16 / In memory object storage system.

\ "memory"

17 / Jottacloud

\ "jottacloud"

18 / Koofr

\ "koofr"

19 / Local Disk

\ "local"

20 / Mail.ru Cloud

\ "mailru"

21 / Microsoft Azure Blob Storage

\ "azureblob"

22 / Microsoft OneDrive

\ "onedrive"

23 / OpenDrive

\ "opendrive"

24 / OpenStack Swift (Rackspace Cloud Files, Memset Memstore, OVH)

\ "swift"

25 / Pcloud

\ "pcloud"

26 / Put.io

\ "putio"

27 / SSH/SFTP Connection

\ "sftp"

28 / Sugarsync

\ "sugarsync"

29 / Transparently chunk/split large files

\ "chunker"

30 / Union merges the contents of several upstream fs

\ "union"

31 / Webdav

\ "webdav"

32 / Yandex Disk

\ "yandex"

33 / http Connection

\ "http"

34 / premiumize.me

\ "premiumizeme"

35 / seafile

\ "seafile"

Storage> 13
You’re prompted for a Google Application Client ID. Press “Enter” to accept the default.
Storage> 13
** See help for drive backend at: https://rclone.org/drive/ **
Google Application Client Id
Setting your own is recommended.
See https://rclone.org/drive/#making-your-own-client-id for how to create your own.
If you leave this blank, it will use an internal key which is low performance.
Enter a string value. Press Enter for the default ("").
client_id>
OAuth Client Secret
Leave blank normally.
Enter a string value. Press Enter for the default ("").
client_secret>
You’re then prompted for a Google Application Client Secret.
Storage> 13
** See help for drive backend at: https://rclone.org/drive/ **
Google Application Client Id
Setting your own is recommended.
See https://rclone.org/drive/#making-your-own-client-id for how to create your own.
If you leave this blank, it will use an internal key which is low performance.
Enter a string value. Press Enter for the default ("").
client_id>
OAuth Client Secret
Leave blank normally.
Enter a string value. Press Enter for the default ("").
client_secret>
Again, just press “Enter.” You’re asked to provide the scope that rclone will have when it is operating on your Google Drive. Press “1” and then press “Enter.”
client_secret>
Scope that rclone should use when requesting access from drive.
Enter a string value. Press Enter for the default ("").
Choose a number from below, or type in your own value
1 / Full access all files, excluding Application Data Folder.
\ "drive"
2 / Read-only access to file metadata and file contents.
\ "drive.readonly"
/ Access to files created by rclone only.
3 | These are visible in the drive website.
| File authorization is revoked when the user deauthorizes the app.
\ "drive.file"
/ Allows read and write access to the Application Data folder.
4 | This is not visible in the drive website.
\ "drive.appfolder"
/ Allows read-only access to file metadata but
5 | does not allow any access to read or download file content.
\ "drive.metadata.readonly"
scope> 1
For the “ID of the root folder”, just press “Enter.”
scope> 1
ID of the root folder
Leave blank normally.
Fill in to access "Computers" folders (see docs), or for rclone to use
a non root folder as its starting point.
Enter a string value. Press Enter for the default ("").
root_folder_id>
Service Account Credentials JSON file path
Leave blank normally.
Needed only if you want use SA instead of interactive login.
Enter a string value. Press Enter for the default ("").
service_account_file>
At the “Service Account Credentials” prompt, press “Enter.”
At the “Edit advanced config” prompt, just press “Enter.” At the “Use auto config” menu, press “y” and then press “Enter.”
service_account_file>
Edit advanced config? (y/n)
y) Yes
n) No (default)
y/n> n
Remote config
Use auto config?
* Say Y if not sure
* Say N if you are working on a remote or headless machine
y) Yes (default)
n) No
y/n> y
This causes rclone to communicate to your Google Drive, and to launch your browser to allow you to give permission for rclone to interact with your Google Drive.
y/n> y
If your browser doesn't open automatically go to the following link: http://127.0.0.1:53682/auth?state=WVr2FUlo3mY03N5hy1WUUw
Log in and authorize rclone for access
Waiting for code...
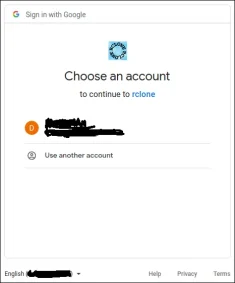
In your browser window, click on the Google account you wish to use.
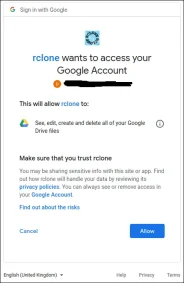
Click the “Allow” button to allow rclone to have access to your Google Drive.
At the “Configure this as a team drive” prompt, type “n” and then press “Enter.”
Waiting for code...
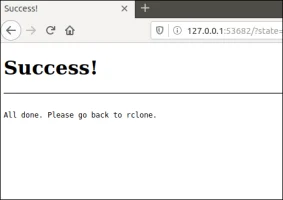
Got code
Configure this as a team drive?
y) Yes
n) No (default)
y/n> n
At the “Yes, Edit, Delete” menu type “y” and then press “Enter.”
y/n> n
--------------------
[google-drive]
scope = drive
token = {"access_token":"ya29.******","token_type":"Bearer","refresh_token":"1//******","expiry":"2023-04-29T14:19:24.229641227+04:00"}
--------------------
y) Yes this is OK (default)
e) Edit this remote
d) Delete this remote
y/e/d> y
At the final menu, type “q” and press “Enter.”
y/e/d> y
Current remotes:
Name Type
==== ====
google-drive drive
e) Edit existing remote
n) New remote
d) Delete remote
r) Rename remote
c) Copy remote
s) Set configuration password
q) Quit config
e/n/d/r/c/s/q> q
The rclone Back Up Script
The rclone application is very feature-rich. That’s great, but it does mean there are a lot of options. The command we’re going to look at below copies files from your local computer to your Google Drive. This is a one-way copy to the cloud; it isn’t a two-way synchronization between your Google Drive and your local computer—although rclone can do that. We’re using this as a basic form of off-site backup.
Type (or copy and paste) this into a text editor and save it to your computer. We called it gbk.sh. You can call it whatever makes sense to you.
#!/bin/bash

/usr/bin/rclone copy --update --verbose --transfers 30 --checkers 8 --contimeout 60s --timeout 300s --retries 3 --low-level-retries 10 --stats 1s "/home/aghassi/Documents" "google-drive:UbuntuDocs"
Here’s what the parameters mean:
- copy: Copy the files from the local computer to the remote storage, skipping over files that are already present on the remote storage.
- –update: Skip any files that are on the remote storage that have a modified time that is newer than the file on the local computer.
- –verbose: Gives information about every file that is transferred.
- –transfers 30: This sets the number of files to copy in parallel.
- –checkers 8: How many “checkers” to run in parallel. Checkers monitor the transfers that are in progress.,
- –contimeout 60s: The connection timeout. It sets the time that
rclone will try to make a connection to the remote storage.
- –timeout 300s: If a transfer becomes idle for this amount of time, it is considered broken and is disconnected.
- –retries 3: If there are this many errors, the entire copy action will be restarted.
- –low-level-retries 10: A low-level retry tries to repeat one failing operation, such as a single HTTP request. This value sets the limit for the number of retries.
- –stats 1s:
rclone can provide statistics on the transferred files. This sets the frequency of update of the statistics to one second.
- “/home/aghassi/Documents”: The local directory to we’re going to copy to the remote storage.
- “google-drive:UbuntuDocs”: The destination directory in the remote storage. Note the use of “google-drive”, which is the name we gave to this remote connection during the the
rclone config sequence. Also note the colon “:” that is used as a separator between the remote storage name and the directory name. Subdirectories are separated by the usual “/” forward slash. If the destination directory does not exist, it will be created.
Some of these values are the defaults, but we’ve included them here so that we can discuss them. That way, if you need to change a value, you know which parameter to adjust.
Make the script executable with this command:
chmod +x gbk.sh
Running the Back Up Script
Our back up script is going to copy our Documents folder to our Google Drive. In our Documents folder, we’ve got a collection of UbuntuDocs.
We can launch the back up script with this command:
./gbk.sh
We asked for statistics updates every one second (--stats 1s), and we also asked for verbose output (--verbose). It’ll come as no surprise then that we get a lot of screen output. It’s usually a good option to turn on verbose output for new functionality so that you can spot problems. You can turn down the amount of output once you’re happy things are running smoothly.
We get a final summary telling us 60 files were transferred with no errors. The transfer took roughly 24 seconds.
Let’s check on our Google Drive and see what happened in our cloud storage “UbuntuDocs” directory has been created, so that looks promising. If we double-click it to take a look inside, we can see that the files have all been transferred to our Google Drive.
Using rclone to View Files On Google Drive
We can use rclone to peek into the folder on Google Drive, right from the terminal window:
rclone ls google-drive:/UbuntuDocs
rclone more option for google-drive.